How to: make classy birthday cakes
Birthdays just got a whole lot easier. Sarah Tennant enlightens us with her second cake article: No-Talent Pinterest Cakes: A Cheat’s Guide to Classiness.
During my single-digit birthdays, every mother in New Zealand had a copy of the Australian Women’s Weekly Children’s Birthday Cake Book, and produced from it according to her talents. Over-achieving mothers did the swimming pool filled with jelly or the castle with ice cream cone turrets; more modest mums did the number 1 covered in Smarties.
They say parenting has become more stressful, perfectionist and competitive since the rise of social media. In general I’d agree – ten years ago you wouldn’t have caught people holding up chalkboards in a gender-reveal photoshoot, and life was more tranquil for it. And I’ve ranted before about the insanely classy birthday parties we’re now expected to produce. But there’s one trend du jour which I adore, because it’s not only better looking than the old-fashioned version, it’s easier. I am referring to the modern Pinterest birthday cake.
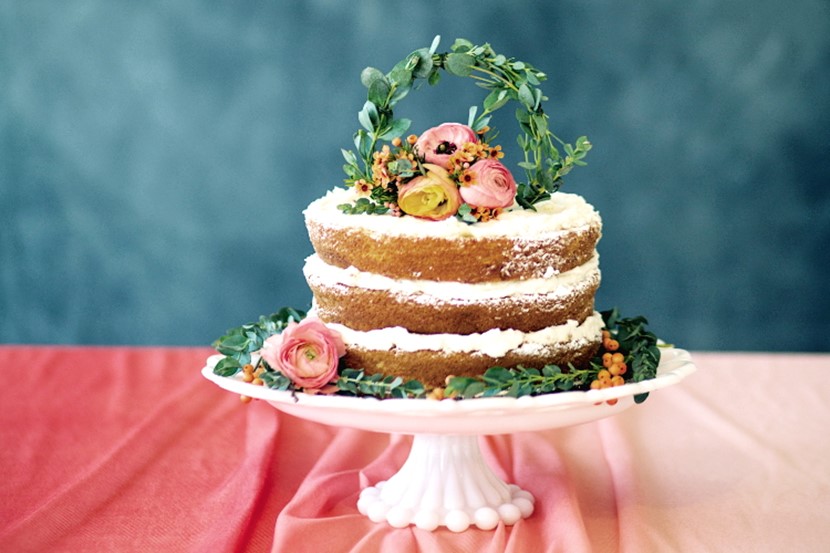
No longer. The modern cake – the Pinterest cake – is stark, dramatic and simple. A sky-high cylinder atop an elegant footed cake-stand, it is decorated with a sprig of rosemary and a pinecone, or a single gold sparkler over dusty pink Swiss meringue buttercream, or a single giant peony and a shred of gold leaf. It looks tasty, and hard to cut, and far more sophisticated than the child whose birthday it celebrates.
And here’s the thing: it’s far, far simpler to make than the old ‘Minnie Mouse outlined in licorice’ we grew up with. So even if you find the concept of cake trends faintly absurd, I urge you to get on the bandwagon: it’ll never be this easy again.

Here follows the formula for a Pinterest cake: minimal talent and maximum trendiness.
Round and tall
The first rule: a Pinterest cake is proportioned roughly like a golden syrup tin. The roundness is because curves are visually pleasing and corners are hell to ice. The height is due to an increased emphasis on decorating the sides of a cake rather than the top. It also forces you to use vast quantities of filling and icing, which is rather nice.
“But my kid wants a Wonder Woman/My Little Pony/Spiderman cake!”, you say. Very well: but the cake can still be round. Never try to make a cake that’s actually shaped like Wonder Woman, unless you have great spatial acuity and a background in sculpture. Chances are you’ll wind up whittling a sheet cake into a mass of crumbs, and producing a disproportionate monstrosity whose eyes are looking unnervingly in different directions, giving the impression she’s about to go for your neck. Likenesses are hard. (So is depicting ‘cake Wonder Woman’ in a manner that doesn’t make her look vaguely pornographic, but that’s another can of worms.)
Hence, when my daughter asked for a Wonder Woman cake, I made a round red cake, topped it with a fondant Wonder Woman logo, and added a fondant ‘lasso of truth’ rope around the bottom edge. See what I mean? Rowan was happy, it got the point across, and I didn’t have to serve anyone a slice of buttercream cleavage.

Nail your techniques
Knowing how to really ice a cake makes it look a lot cleaner and eliminates a good deal of angst. Firstly, keep your cake chilled. Icing a warm cake is disastrous; icing a room-temperature cake invites crumbling and splitting. A chilled cake is structurally far sounder than a tepid one, easier to torte (split horizontally), move and ice. Whenever you have to leave your cake for a few minutes – between torting and filling, filling and icing, icing and separating homicidal toddlers – chuck it in the fridge.
Secondly, the secret to not getting crumbs in your icing is called the crumbing-down layer. All you do is take a small quantity of your icing and firmly butter all exposed surfaces of the cake with it. You don’t need much – think Vegemite, not peanut butter – just enough to seal any errant crumbs against the side of the cake. (If you feel Machiavellian, show the patchy, scantily-iced result to your husband and say anxiously “Does it look okay?”. Watching the fear in his eyes is great fun.)
A limited palette
In cake decorating, as in home decorating, funky and bold is hard to pull off. In a room a rainbow extravaganza can look cluttered and dated; on a cake, it can be actively offputting. (Have you ever, ever been faced with a cake covered in bright blue frosting and thought “Mm, that looks good”? No, you have not.)
Sticking to a very simple colour scheme – monochrome, or one pastel plus metallic accents – will automatically move your cake three social classes higher. It will also save you dirtying six bowls and a million spoons; you’re welcome.
Decorations
A particularly genius feature of the Pinterest cake is its tendency to use non-edible decorations. You do have to swiftly remove all flowers, seashells and twigs from the cake before they’re accidentally eaten by a toddler; but it’s still a lot less effort than trying to craft them out of buttercream.
Good non-edibles include:
🎕 Fresh flowers. Do quickly google to check they’re not toxic, just to be safe; and if the flower has a sappy or milky stem like a poppy, seal it with a candle flame to prevent it leaking into the icing. You can also cover cut stem ends with foil, wrapped in ribbon if it will show. Also, check for bugs.
🎕 Clean (boiled) pinecones, seashells, driftwood, feathers and twigs: these are especially popular for boys’ cakes. Use peeled twigs on top of the cake to hang a strip of scrapbook-paper bunting in the party colours, spelling out the birthday child’s name.
🎕 Sparklers – a lovely, less spitty alternative to birthday candles, but only if your child had the foresight to be born close to November. As I learned rather dramatically one day in a fug of smoke, sparklers go off after several months and can force an entire birthday party to evacuate.
Bad non-edibles include photos of the birthday child in any form (including printed on edible paper), and any obviously chewed, grotty toys.
If you’d rather keep everything on the cake edible, no matter: one of the most luxurious, impressive Pinterest cake looks is also the simplest. All you have to do is pile the top of the cake lavishly with another form of dessert. Profiteroles, truffles, mini-doughnuts, macaroons, whole berries, meringues, churros, chocolate bars ... you name it. Bonus points if these are sitting on a pool of chocolate or caramel sauce, which you’ve drizzled artily so it drips down the sides.
The cake-topping dessert can even be luscious round scoops of ice cream in various flavours – just serve the cake promptly, and make someone else cut it!
HOW TO ICE A CAKE: A QUICK AND DIRTY GUIDE
1. Bake two recipes’ worth of cake mixture in two round pans. Cool, then chill the cakes.
2. Cut any doming of the top of each cake so they’re flat-topped. Slice them horizontally into two or more layers each.
3. Use a dab of icing to stick the first layer of cake to the cake board or serving platter.
4. Build the cake layer by layer with icing or filing between each round. Save the bottom of one of the cakes to use as your top layer, upside-down so the crust is uppermost. Don’t put icing or filing on this layer. Chill the whole cake.
5. Smear a crumbing-down layer all over the cake. Chill again.
6. Ice the cake using a big palette knife – top first, then sides. Use a turntable or lazy Susan if you can find one. Use a damp cloth to clean the excess icing from the cake board, then chill the cake again.
7. Add any decorations you want. Chill again.
8. Take the cake out of the fridge an hour or two before serving to let it come to room temperature.
OTHER EASY CAKE-DECORATING IDEAS:
🎕 Cut strips of baking paper and lay them lightly across the surface of the icing to make patterns. Sift cocoa powder or edible glitter over the whole cake, then carefully lift the paper strips off. This also works with slightly chunkier toppings such as chopped nuts, grated chocolate and sprinkles.
🎕 Pipe plain dots in a random pattern over the top and sides of the cake. Can’t pipe? Use just one colour of big pearl cachous from a cake-decorating shop. Or mix a touch of edible glitter with vodka and paint dots or plus-signs (they’re trendy, no idea why) over the cake in a rustically imperfect way.
🎕 Mix up two colours of icing (say, white and pink). Ice the bottom half of the cake with one colour, and the rest with the other. Let the colours mingle a little where they meet. (Ombre is a bit fiddlier, and this looks good.)
🎕 Gently press toasted threaded coconut into the icing all over the cake.
🎕 Ice a cake sparsely so the cake shows through (the semi-naked cake look); this looks surprisingly good accented with wildflowers or sprigs of rosemary.
🎕 Top the cake with a large, gently teased cloud of candy floss.
And if all else fails, don’t forget the ultimate Pinterest cake decorating tool: an Instagram filter. Hey, it’s not like your two-year-old will remember how the cake really looked anyway.

SWISS MERINGUE BUTTERCREAM
Ingredients:
• 5 egg whites
• 2 ¼ cups white sugar
• 500 grams butter, cut into 2cm cubes, at room temperature
• 2 tsp vanilla or other flavouring
Method:
1. Put the egg whites and sugar in a large mixing bowl and set over a pan of simmering water. Stir occasionally with a whisk until the mixture is warm and the sugar has dissolved (it should not feel gritty between your fingers).
2. Take the mixing bowl of the heat and cool for a few minutes in a sink of cold water. With electric beaters, beat until the mixture is cool and forms a thick meringue.
3. Drop the soft but not oily pieces of butter into the meringue one at a time while beating. Beat until fluffy and thick. Add vanilla or other flavourings and beat to combine.

AS FEATURED IN ISSUE 41 OF OHbaby! MAGAZINE. CHECK OUT OTHER ARTICLES IN THIS ISSUE BELOW
